Thursday 21 May 2015

Knitting Needle and Crochet Hook Conversion Charts

A while back I wrote about inheriting boxes filled with Grandma's craft stuff.  I have more knitting needles and crochet hooks now than I think any one sane person should own, but I can't quite make myself give any away or sell the clearly vintage hooks.

This isn't all of them.


The challenge comes from trying to understand exactly what size some of them are.  This gets worse with some of the hooks when their marked with a 5 and seem to be about 5mm.  Actually, they're a UK size 5 hook which is really 5.5mm.

Fortunately for me, I also got this wee gadget that is especially helpful with sock needles that have no markings whatsoever.

Metric side

UK side

For everything else, there are these charts below.  I thought them worth sharing because sometimes I can't remember if it's a 10 or 11 needle I need right now and it's difficult to tell the difference with the naked eye.

Knitting Needle Conversion Chart


Metric (mm)
US    
UK & Canadian
2.0
0
14
2.25
1
13
2.75
2
12
3.0
-
11
3.25
3
10
3.5
4
-
3.75
5
9
4.0
6
8
4.5
7
7
5.0
8
6
5.5
9
5
6.0
10
4
6.5
10 1/2
3
7.0
-
2
7.5
-
1
8.0
11
0
9.0
13
00
10.0
15
000
12.0
17
-
16.0
19
-
19.0
35
-
25.0
50
-


Crochet Hook Conversion Chart


Metric (mm)
US
UK & Canadian  
2.0
-
14
2.25
B/1
13
2.5
-
12
2.75
C/2
-
3.0
-
11
3.25
D/3
10
3.5
E/4
9
3.75
F/5
-
4.0
G/6
8
4.5
7
7
5.0
H/8
6
5.5
I/9
5
6.0
J/10
4
6.5
K/10 1/2
3
7.0
-
2
8.0
L/11
0
9.0
M/13
00
10.0
N/15
000

Knitting Abbreviations and Terminology

While some patterns seem to create their own special abbreviations and it's always worth checking the pattern to see what they mean by theirs, below I've listed some common ones and the ones I use.

K - knit.
P - purl
Sl - slip - pass the next stitch onto the other needle without working it.
St(s) - Stitch(es).
Psso - pass slipped stitch over.  When you have slipped one st, then worked one st, pull the slipped st over the worked st and over the end of the needle.
K2tog - knit 2 sts together.  Push the right hand needle through the next two sts and knit them as if they were a single st.
P2tog - Purl 2 sts together.
Yo - yarn over.  Wrap the yarn around the needle once as if it's another stitch and continue with your work.  This usually appears after a k2tog and creates a small hole for a buttonhole or for a lacy effect.
RS - Right side facing you- the side that will be facing outwards or seen when the project is finished.
WS - Wrong side facing you - the inside or hidden side of your work.
Rep - repeat.
Cont - continue

Pick up and knit - This is usually done when working down the side edge of previously knitted work.  Space out picked up sts as evenly as possible, lift a loop from the end of a row with your left hand needle and knit it onto the right hand needle.

Garter Stitch - all rows knit.
Stocking Stitch - 1 row knit, 1 row purl, repeated.
Rib - K1, p1, k1, p1 to end.  Or k2, p2, k2, p2 to end.  Most patterns will tell you which is used in this project.

Knitted Socks

I wrote some time ago sharing two patterns for socks.  While both worked, I found the triangular type heel on the second pattern seemed to wear very quickly and all the socks I'd made got holes in them around the heel.  Perhaps I didn't make the soles long enough.

I found another pattern that has a squarer heel that is simple and seems to work and last better.

The yarn I use is my double knit sized homespun.  I've made socks for a size 12 foot and socks for a size 9 using the same amount of stitches around, just varying the length of foot and they've fit everyone they've been made for.  I know many patterns increase the number of stitches in a round for the size of foot, but I've found that to be completely unnecessary.

The wool I've been spinning is Texel fleece.  I was frequently told that Texels are a meat breed and their wool isn't used for much.  I live in sheep farming country and most of my neighbours have been farming sheep for their entire lives.  I spent a bit of time on Google specifically looking for Texel wool uses and found that it's a sturdy fibre that keeps it's springiness, it's often used in hosiery and is a favourite for needle felting.  Socks it is then.

The first three pairs of socks I made out of my homespun Texel wool were for people that I knew to be very hard on their socks.  I've told them they're my guinea pigs and I want them to be honest about how their socks wear.

My father, in particular, is hard on socks.  His odd shaped feet just aren't catered to by sock manufacturers.  His big toe is his longest toe by quite a lot, and the difference between the end of his big toe and the start of the slant from his little pinky toe is about 8cm (3 inches).  So I made his socks shaped to his feet.  He has quite a distinct left foot and right foot.  They fitted perfectly and I think he was surprised by this, even if they look a bit odd when not on his feet.

I've learned that a shorter leg length (above the heel) is not practical in socks.  I think when I was making those ones, I was bored with just going around and around and decided that I liked short ankle socks.  These socks now fall of when I take my foot out of a gumboot, actually they fall off constantly.  I picked up the stitches at the top of the cuff and added an extra stretch of ribbing.  They stay on much better now.

Showing the extra band I added at the top


My current sock pattern is:

Socks


Note: Check out the page for knitting abbreviations.

With 3.25mm sock needles, loosely cast on 48 sts and distribute evenly between three needles in a round, taking care not to twist the starting round.

Work in K2 P2 rib to desired length for cuff, then K all stitches to desired length to heel.  Adjust the stitches so that 24 sts are on the needle for the heel and 12 sts each on the other two.

Heel
Next Row: K all 24 sts on the needle, turn.
Next Row: P back across those 24 sts.
Continue working on only these sts for 12 more rows.
Turn Heel
Row 1 (RS): K13, sl 1, k1, psso, k1 turn.
Row 2 (WS): Sl 1, p3, p2tog, p1, turn.
Row 3: Sl 1, k4, sl 1, k1, psso, k1, turn.
Row 4: Sl 1, p5, p2tog, p1, turn.
Row 5: Sl 1, k6, sl 1, k1, psso, k1, turn.
Row 6: Sl 1, p7, p2tog, p1, turn.
Continue in this manner until 14 sts remain ending with a WS row.
Next Row: K to end, pick up and k 11 sts down the side of heel, knit across other two needles putting sts from both onto one needle, pick up and k 11 up the other side of heel and k 7 from last needle onto that needle.  The needles that have the picked up stitches should now have half each of the heel sts with the other needle holding 24 of the sts that were unworked during the heel shaping.
Next Round: K all sts for 2 rounds, starting and finishing in the centre of the heel.
Gusset
Next Round: K to last 3 sts of first needle, k2tog, k1; k across all 24 sts of next needle, on third needle, k1, sl 1, k1, psso, k to end.
Next Round: K all sts.
Next Round: K to last 3 sts of first needle, k2tog, k1; k across all 24 sts of next needle, on third needle, k1, sl 1, k1, psso, k to end.
Next Round: K all sts.
Continue to decrease in this manner until first and third needles each contain 12 sts - 48 sts in total.
Foot
Next Round: K all sts.
Repeat this round until foot measures approx 3.5cm (1 1/4 inch) less than required length.
Toe
Next Round: K to last 3 sts of first needle, k2tog, k1; second needle, k1, sl 1, k1, psso, k to last 3 sts of second needle, k2tog, k1; third needle, k1, sl 1, k1, psso, k to end.
Next Round: K 1 round straight.
Repeat these two rounds 3 times more - until there are 32 sts total.
Continue to decrease in every round for the next five rounds - until 12 sts remain in total.
Either graft front and back together, or cast off loosely and join seam.

A sock currently part way up the foot.  Showing the heel working.


Tuesday 19 May 2015

Cheese Making

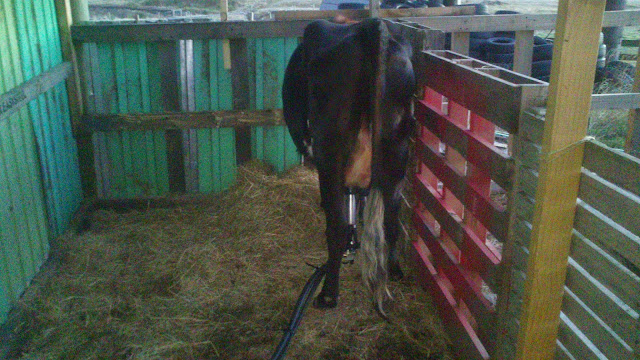
Now I have the milking machine up and running, I have plenty of milk, gained far quicker and more easily.  What had been taking me at least half an hour now takes approximately 15 minutes including the time spent moving Brownie in and out of the shed and cleaning the milking machine.

Brownie on the milking machine
While we're still not getting lots, we're getting excess to our milk drinking requirements.  I have enough left over that I have been experimenting with different cheeses.

I currently have two Gouda cheeses maturing, a Cheddar drying before waxing and Minas in the fridge.  I also have a complete failure of two Camembert wheels.  They won't be wasted, they may be hard as wood, but will still double for Parmesan in most things.


Two waxed Goudas maturing

Farmhouse Cheddar drying

The Minas Cheese came as a request from a workmate of Hubby's.  She's Brazilian and finds it hard to find Minas in NZ and had been missing it greatly.  She raves over just how yummy it is.

I went searching for recipes.  I found plenty of history on the Minas cheesemaking region in Brazil.  I found discussion on the composition (in chemical terms) of Minas and how it's texture differs from other cheeses.  I found recipes in Portugese with no translation.  I really struggled to find a recipe.

The workmate offered to translate recipes into English for me and also said she'd ring her Sister-in-law in Brazil and get her recipe because the SIL has a small farm and makes her own.  Then I found a blog with a video of someone making Minas.  Every so often, the video stops and there are instructions in English come up as text, so I copied it down and then made it into more readable English.

I reduced the volume by 80% and made Minas cheese.  It's a fresh cheese, rather roughly handled throughout (which surprised me) and is simple to make.  I sent a small wheel into work with Hubby the next day and waited for the response. 

About halfway through the day, I decided to try some.  I found it bland and almost tasteless although the silky texture was nice.  By the time Hubby got home, I was convinced I'd made the wrong thing.  This couldn't possibly be the same cheese she'd been describing as SO yummy.

I said as much to Hubby.  He raised an eyebrow and then showed me the text message he'd just received.  It was the workmate gushing gratitude and exclaiming over how yummy my Minas was.  I wondered if perhaps there was something wrong with my palate and so I cut a slice for Hubby.  He frowned and said the same as I had, but different cultures and different tastes and all that.

Anyway, here is the recipe I used.  The original called for 18 litres of whole milk to make 3 1kg cheeses.  I've reduced it somewhat.

Minas Cheese


3.6 litres whole milk
2 ml rennet
30g salt

If it is cold weather, have 1 l boiled water ready for when you break the paste.

Add rennet to milk and stir it well.  (The original called for a wooden spoon that is only used for making Minas).

Add salt and mix well.

Cover and leave for 2 hours.

Break up to separate curds and whey.  There was no mention of any size cubes to be cut, just break it up.  This is where you can add the boiled water which can also make a firmer cheese.  Strain out the curds and press (with hands) into cheese molds.  Press it down firmly to remove as much whey as possible.

After about half an hour, flip the cheese mold over and repeat after another half hour.